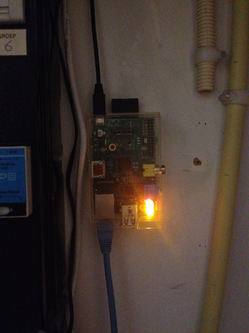
I thought it'd be fun to strip down and reconfigure my Raspberry Pi in order to turn it into a mighty mini-webserver.
My starting point is the default Raspian Wheezy download and the setup as explained on the website page Installing Operating System Images on Linux. Run the raspi-config command and do the following:
[Note: you can skip this section with the newer operating system images made available where by default ssh is enabled for pi/raspberrypi and boot to desktop disabled]
- Enable SSH
- Disable boot to desktop
- Use all of the SD Card (in my case 32GB)
- Rename the hostname
- Reduce the GPU memory to 16MB
Once you have followed the setup instructions, ssh pi@raspberrypi to get there. Here raspberrypi should be replaced by the IP address, for example 192.168.2.101 in my case. You can then run the command dpkg -l in order to see what is installed, followed by apt-get purge in order to strip out the extra stuff you no longer need.
Since this is a streamlined webserver, there is no need for any of the GUI desktop stuff. I also want to remove Python, sound-related (alsa) stuff, samba and other junk. Therefore, run sudo su - and fire off the following commands:
$ apt-get update
$ apt-get purge xserver* ^x11 samba* ^libx ^lx samba* libsmbclient python* desktop-file-utils nano tsconf xkb-data console-setup penguinpuzzle omxplayer gtk* libgtk* alsa* -y
$ apt-get autoremove -y
$ apt-get upgrade -y
$ apt-get clean
I chose the lightweight nginx as my preferred webserver:
$ apt-get install nginx
Since I will no longer be needing the extra memory for the GUI, I can free up the memory by editing the file /boot/config.txt and ensuring that the following line is present:
gpu_mem = 16
No need to keep the pi user around anymore since I have created a new user to do all of the heavy stuff. You'll probably want to use a different name suiting your needs, but I'll use this as an example. From now on replace the word kiffin with your own.
$ sudo adduser kiffin
Now the tricky part. As the user pi edit the sudoers file by running the command sudo visudo. At the bottom of the file you'll see something like this:
#includedir /etc/sudoers.d
pi ALL=(ALL) NOPASSWD: ALL
Replace the user pi with kiffin and save the file. Enter exit twice to return to your terminal, and then access the server again using the command ssh kiffin@raspberrypi.
Now you can run sudo su - and get rid of the pi user like this:
$ deluser pi
$ rm -rf /home/pi
Since I'm also an avid user of GNU Screen, I installed it as well:
$ sudo apt-get install screen
Now it's time to create a simple webpage by going to the document index directory and creating an index.html file to suit your needs.
$ cd /usr/share/nginx/www
$ cat index.html
<head>
<title>KiffinWeb</title>
</head>
<body bgcolor="white" text="black">
<center>
<h1>Welcome to KiffinWeb!</h1>
<img src="raspberrypi.png"/>
<p>
This is an <a href="http://nginx.org/en/">nginx</a> web server running on a <a href="http://www.raspberrypi.org/">Raspberry Pi</a> mini-computer.
</p>
<p>
<a href="http://www.kiffingish.com/2013/09/raspberry-pi-webserver.html">Make one yourself</a>
</p>
<p>
Brought to you by <a href="http://www.kiffingish.com/">Kiffin Gish</a>.
</p>
</center>
</body>
</html>
Once you've got everything setup to your heart's delight, it's probably a good idea to make a backup of this image just in case. For example, when the electricity fails causing the SD Card to become corrupted.
Shutdown the raspberry pi (sudo shutdown now), wait one minute, take out the SD Card and put it in your laptop. I then run the following command to copy the image to a local backup file:
$ sudo dd bs=4M count=800 if=/dev/mmcblk0 of=/home/kiffin/raspberrypi-kiffinweb-20140925.img
Take the SD Card out and insert it back in the device and connect it to the power supply. Make some last changes in the configuration:
- Use all of the SD Card (in my case 32GB)
- Rename the hostname
- Reduce the GPU memory to 16MB (already done above)
$ sudo rasp-config
Once everything has been finalized, I reboot with shutdown -r now and ssh kiffin@raspberrypi to my webserver again. Here's how much additional space I've created:
kiffin@raspberrypi:~# df -H
Filesystem      Size  Used Avail Use% Mounted on
rootfs           32G  751M   30G   3% /
/dev/root        32G  751M   30G   3% /
devtmpfs        247M     0  247M   0% /dev
tmpfs            51M  234k   51M   1% /run
tmpfs           5.3M     0  5.3M   0% /run/lock
tmpfs           102M     0  102M   0% /run/shm
/dev/mmcblk0p1   59M   19M   40M  33% /boot
Of course, in order to make the web server accessible from the outside world, you will have to use NAT by configuring the router to forward HTTP (port 80) and SSH (port 22) to transfer these requests to the IP-address of the Raspberry Pi server.
Here's proof that it really works:
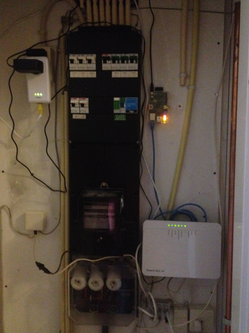
For convenience, everything is setup downstairs in the electricity cupboard.
The Raspberry Pi is connected to the KPN Experia Modem with the blue Ethernet cable and the power supply is the black cord going up over the fuse box to the socket.


