Category: Ubuntu
For many weeks maybe even months, I was having lots of problems with a very slow wifi connection, and it was driving me crazy. A couple times I slammed my fist so hard on the table top that I nearly broke my hand.
None of the other laptops in the house were having any problems, but they're all Windows machines and I'm using Ubuntu.
There I was complaining all the time, for once Windows was actually out performing Linux which when you think about it is impossible. What could be wrong?
Googled around and found it fairly quickly. To think that after all the misery and stress, I could solve this ornery issue by using the following simple command:
$ sudo echo "options ath5k nohwcrypt=1" > /etc/modprobe.d/ath5k.conf
You might need to change the '5' to a '9' if you have the newer driver installed. But I'm still using Ubuntu 10.10 and haven't built up enough courage to do an upgrade.
Now my wifi connection is really buzzing along and it feels great, like I've been liberated somehow.
Here's a quick recipe for disaster. Say that you want to blow-up your Linux system, along with all those important documents, emails, etc. You're kind of in a self-destructive mood, or just not thinking, kind of like I was yesterday afternoon right when it was time to go home.
Warning: do not really run the following command (but this is what I ran nonetheless):
$ sudo apt-get -y remove perl
I realized my mistake right away, but it was too late. Unfortunately, most of the important stuff depends on Perl so by removing it I crippled my system and made it completely useless. Oops.
So why would someone be so stupid and do this in the first place? I mean really. Well, I had inadvertently messed up my Perl development settings and accidentally deleted an important Perl library sub-directory.
Wrong, should have used --reinstall instead, you dummy. Using the -y was pretty stupid also.
I've been struggled now for quite sometime trying to figure out how to get my stupid upside down webcam on my laptop back rightside up where it belongs but to no avail. Finally as of today, it works like it should.
For those interested, here's how I flipped it around.
$ wget http://people.fedoraproject.org/~jwrdegoede/v4l-utils-0.7.92-test.tar.gz
$ tar xvfz v4l-utils-0.7.92-test.tar.gz
$ cd v4l-utils-0.7.92-test/lib
$ make PREFIX=/usr
$ sudo make install PREFIX=/usr
After that I can fire up skype/cheese from the terminal like this:
$ LD_PRELOAD=/usr/lib/libv4l/v4l1compat.so skype|cheese
Or by editing the application launcher to include this as the command:
$ /bin/sh -c "LD_PRELOAD=/usr/lib/libv4l/v4l1compat.so skype|cheese"
Thanks alot Hans de Goede for taking the time and fixing this for me, providing me with the tarball mentioned above.
21 October 2012: I discovered the following official Ubuntu link How to get your ASUS U36SD running Ubuntu GNU/Linux.
Basically, in order to get the camera to not be upside-down in Skype, you have to do the following:
$ sudo add-apt-repository ppa:libv4l
$ sudo apt-get update && sudo apt-get install libv4l-0
Then run your application with LD_PRELOAD=/usr/lib/i386-linux-gnu/libv4l/v4l1compat.so in front of it, e.g. to run skype:
$ LD_PRELOAD=/usr/lib/i386-linux-gnu/libv4l/v4l1compat.so skype
What a pain in the butt. If you own an MSI Wind Notebook, don't rush out there like me and upgrade to Karmic 9.10 without first thinking.
That's exactly what I did, and because I rushed the result was a completely unusable system. One where the monitor flickers endlessly like a maniac, the brightness trembling nervously like the system is about the explode any second.
Turns out that this is a known problem: brightness is broken on MSI WIND U100. I should have been more careful, checked possible problems in advance. So listen to me and be wary.
According to the bug description, there are all kinds of workarounds and possible fixes, e.g. disabling the gnome-power-manager, hitting the Fn+11 key or whatever. However, after spending a good portion of the morning trying them all, nothing works to my satisfaction.
Fortunately there's a relatively easy way to re-install Jaunty Jackalope 9.01 via the USB-stick, but first I needed to backup all of the important stuff under my /home/kiffin/* directory.
I use the Wind Notebook alot in the train, to read my email, to conduct remote maintenance, to do some last-minute programming or simply to surf the Internet aimlessly, so the idea is that I can get it all up and running before tomorrow.
Hopefully in the next update they'll have gotten this problem fixed. Before I jump the gun again and upgrade, I'll make sure to read the release notes and verify that this aggravating problem has been fixed.
I am the happy owner of an ASUS X59SL-AP275C laptop which normally runs Ubuntu 8.10 (Intrepid Ibex) without a hitch.
Well, at least until I upgrade to a newer Linux kernel, for example today to 2.6.27-14-generic. When that happens, my wireless connection dies and I have to rebuild and reinstall the MadWifi Linux kernel driver for Wireless LAN devices with Atheros chipsets.
So in case anyone out there has the same problem and has pulling one's hair in frustration, I hope that this explanation will help.
First of all, make sure that this ethernet controller is installed:
$ lspci|grep Atheros
You should see something like this:
02:00.0 Ethernet controller: Atheros Communications Inc. AR242x 802.11abg Wireless PCI Express Adapter (rev 01)
The next step is very important: make sure that your Wifi switch is turned on. Mine is located on the left side of the laptop and switched towards me.
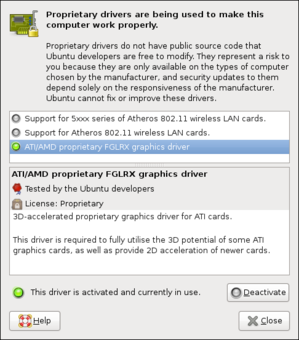
Now go to System > Administration > Hardware Drivers and make sure that support for 5xxx series of Atheros 802.11 wireless LAN cards is disabled. It should look something like this:
If it is not, then disable and reboot:
$ sudo reboot
Make sure that the relevant drivers are automatically loaded at boot by editing the /etc/modules system file:
$ sudo gedit /etc/modules
and ensure that the following lines are present:
ath_pci
ath_hal
wlan
wlan_scan_sta
Now make sure that these same drivers are NOT blacklisted, e.g. not present or commented out in the blacklist system file:
$ sudo gedit /etc/modprobe.d/blacklist
Disable ath0 and wifi0 just in case:
$ sudo ifconfig ath0 down
$ sudo ifconfig wifi0 down
The rest is down hill from here. If you don't already have it, grab the madwifi-hal-0.10.5.6 from the MadWifi repository:
$ svn checkout https://svn.madwifi-project.org/madwifi/branches/madwifi-hal-0.10.5.6 madwifi
If you are more daring, you can also grab the latest version from the trunk:
$ svn checkput https://svn.madwifi-project.org/madwifi/trunk madwifi
There are a couple of utility scripts to unload the drivers and clean up the environment just in case:
$ cd madwifi/scripts
$ sudo ./madwifi-unload
$ sudo ./find-madwifi-modules.sh $(uname -r)
$ cd ..
Now it's time to build and install the driver the usual way:
$ sudo make unload
$ sudo make clean
$ sudo make
$ sudo make install
Load the module into the Linux kernel and enable:
$ sudo modprobe ath_pci
$ sudo ifconfig ath0 up
Display the wireless configuration:
$ iwconfig
You should see something similar to this:
lo        no wireless extensions.

eth0      no wireless extensions.

wifi0     no wireless extensions.

ath0      IEEE 802.11g  ESSID:"XXXXXXXXXXXXX"  Nickname:""
          Mode:Managed  Frequency:2.437 GHz  Access Point: 00:14:7F:8A:74:E3
          Bit Rate:6 Mb/s   Tx-Power:17 dBm   Sensitivity=1/1
          Retry:off   RTS thr:off   Fragment thr:off
          Power Management:off
          Link Quality=21/70  Signal level=-74 dBm  Noise level=-95 dBm
          Rx invalid nwid:848  Rx invalid crypt:0  Rx invalid frag:0
          Tx excessive retries:0  Invalid misc:0   Missed beacon:0

pan0      no wireless extensions.
Next enable scanning:
$ sudo modprobe wlan_scan_sta
And then display list of available wireless stations:
$ wlanconfig ath0 list scan
Which should provide a list similar to this:
SSID            BSSID              CHAN RATE  S:N   INT CAPS
XXXXXXXXXXX...  00:14:7f:8a:74:e3    6   54M 24:0   100 EP   WME
Nummer 5        00:12:17:60:50:c5   11   54M  9:0   100 EPs
Sitecom         00:0c:f6:3e:ea:1f   11   54M 13:0   100 Es   WME
Biesploos       00:11:50:8b:83:76   11   54M  4:0   100 EPs
...
If however the previous command results in an empty list, or something hasn't been working as expected, then simply reboot your laptop (and cross your fingers):
$ sudo reboot
If the Wifi is still not working then as a last resort you might want to try the following:
- Make sure that the WiFi switch on the side of the laptop is turned on! In my case, the switch is on the left side and should be slid towards the front. Wait about ten seconds.
- Hit the Fn-F2 combination key and wait a few seconds.
Hopefully now everything should be working just fine. If not then I'm sorry and wish you good luck searching further.
If you happen to discover a directory which for some reason happens to be called '~' please do not and I repeat do not try to delete it by running the 'rm -rf ~' command.
Oops.
The correct (safest) way to do this is to fire up Nautilus file manager and remove the file via the graphical interface.
Next time make sure that you've made a recent backup of your home directory in case disaster strikes again.
This evening I upgraded my xfce4 desktop to use Linux 2.6.27-11-generic and the next time I rebooted my panels had completely disappeared.
The solution was to startup in terminal mode and run the following command:
$ mv ~/.config/xfce4 ~/.config/xfce4.backup
After another reboot, all is back to normal except for a couple small tweaks I have to make in order manually to restore my panels as they were.

Give or take one hour later the file download completed. The installation went without a hitch. However, it created a dual boot system and installed Ubuntu by default (didn't even ask me if I wanted Xubuntu instead). Still gotta figure out how to remove Windows and replace Ubuntu with the lighter Xubuntu instead.
Here's someone else who claims they got it fixed: http://k.dieplz.net/evolut
Finally got my wireless connection to work properly. To see how I did it check out the following link: http://k.dieplz.net/evolut
In a nutshell this is what you have to do:
- Go to the download page for rt2860-source_1.8.0.0-3_all.deb and download the correct version from one of the listed mirrors
- Make sure that you have the debhelper and module-assistant utilities installed by running '
sudo aptitude install debhelper module-assistant' - Build a binary package of the driver by running '
sudo m-a a-i rt2860' and module-assistant will do the rest for you. - Run '
sudo modprobe rt2860sta'and you should be able to connect to a network with Network Manager. If not then you'll have to reboot. - Finally run '
sudo gedit /etc/modules' and on the bottom you append a new line with'rt2860sta' so that the driver will be loaded automatically whenever the machine is booted.

I was hoping to do the same with favorite good old FreeBSD. However, it will not install correctly because it cannot find the boot loader for some weird reason. I tried it with FreeBSD 6.4, 7.0 and 7.1 beta but none of the worked.
I've completely had it up to here with Windows Vista. So this evening I decided to remove it completely from my hard disk and replace it with Ubuntu.
To prove to myself that I am daring and adventurous, meaning one who gleefully lives on the bleeding edge of all things pleasant and demanding, I installed Ubuntu 8.10 beta version (Intrepid Ibex).
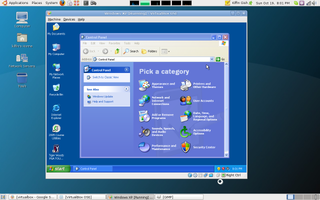
If worse comes to worse I can always run Windows Vista using VirtualBox.
Now everything works perfectly well and very fast indeed. I've got sound, I've got an ethernet card that's recognized properly, and the wifi minicard works like a charm.
Thanks alot Ubuntu Intrepid Ibex!


Recent Comments
- Charles
- jpmcfarlane
- Kiffin
- jpmcfarlane
- KathleenC